

Production
THE TECHNIQUE
DRAWING:
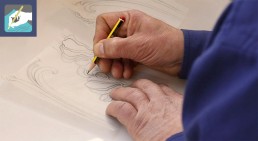
After making several graphic and pictorial sketches to simulate the final appearance of the work, the artist draws by hand the subject to engrave, following with precision (and a pencil) his inspiration and thinking about down to the smallest detail how the colours will fill the tile.
PLASTER CRAFTING:
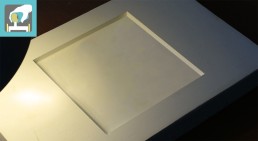
The “formatore” (mould-maker), consulting the artist and his requirements on format and size, manually crafts the plaster “madreforma” (a hollow mould). This will shape the clay by pouring liquid plaster over a smooth model. In most cases the “madreforma” is a square or rectangular tile, but it could be even a more complex form, i.e. the one of a decorative plate or a large tile.
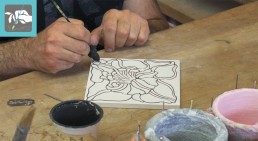
ENGRAVING:
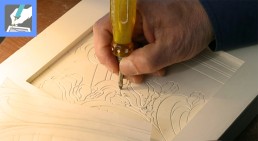
Roberto Tastardi, the engraver of the manufactory, using numerous handcrafted burins, engraves completely by hand the “mirror” design in the cavity of the “madreforma”. During this operaration, particular care is given to “closing” all the incised marks by forming the areas in which each colour will be enclosed.
BAS-RELIEF MODELLATION (additional):
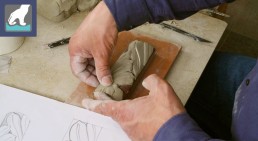
During the modellation the artist draws a preliminary sketch of the subject he wants to represent and then, to shape his design, he adds and smooths many small pieces of soft clay with his finger until he creates a small “bas-relief” sculpture. Although this phase is not important in our “cloisonné” technique, is often integrated to create special friezes for different compositions or used to create beautiful “torelli” (ceramic borders), with beautiful protruding plastic shapes.
BAS-RELIEF PLASTER CASTING ( additional ):
The “formatore” (mould-maker), after building a small frame around the model with various materials, hand-makes a negative mould by pouring liquid plaster over the bas-relief model.
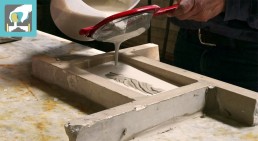
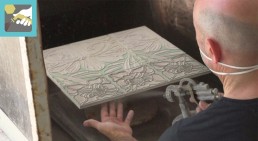
CLAY MOULDING:
The craftsman casts by hand the white clay inside the “madreforma”, then removes the excess and smoothes it with a wooden squeegee. Finally, after a few minutes he meticulously extracts the moulded artefact, paying lots of care to not deform it.
DRYING PROCESS:
The drying process can take place either naturally in the open air when the weather is warm, or in heated chambers during the winter months. This is a very delicate phase, in which the pieces, as they lose their moistness, change colour and become lighter, shrinking up to 5%. This process is scrupulously managed by adding and removing weights so that the pieces are not subjected to damage nor distortions. Thus the artefacts go from a soft state to a dry state, becoming very fragile.
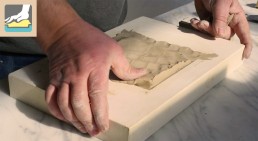
HANDMADE POLISHING:
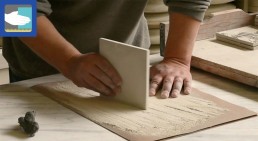
The dried but fragile pieces are very delicately handled by the craftsman, who scrubs them on sandpaper and abrasive materials, smoothing the edges and eliminating any imperfections. This phase, being totally handmade, results in each piece having small differences in size. This feature does not represent a deficiency but, on the contrary, is a guarantee of craftsmanship.
FIRST FIRING (biscottatura):
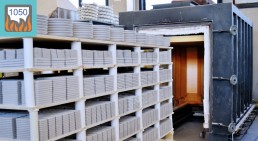
The kiln workers, starting from the bottom upwards and alternating vertical columns with horizontal fireproof plates, build a structure similar to one of a small building with many floors. Inside this structure, all the pieces are stacked one by one, to then be fired. Once the construction work is complete, the kilnsmen light all the burners in the firing chamber with a flame, they place the trolley with the tiles, close the hatch and finally the firing process starts, initiating the slow rise in temperature up to 1050°. This process, which lasts about 12 hours, results in the fire-hardened pieces to become stiff, porous, resistant and a beautiful snow-white colour.
HANDBRUSH DECORATION (additional):
Although the brush decoration is not normally necessary in our ‘ceramic cloisonné’ technique, it is sometimes integrated either to give particular emphasis to more prominent parts of the reliefs or to create lights and shades effects and colour nuances on the smooth parts which then filter through the coloured crystallines. This type of decoration, achieved by dipping soft brushes into the superfine ceramic colours, has always been considered the most complex in the world of painting because it does not allow for errors or second thoughts. It can only be executed by skilled and steady hands, and although for small pieces it is within the reach of most of our artisan decorators, for larger and more complex pieces it is done by Paolo, our skilful head painter and highly experienced decorator, and by Roberto Tastardi himself.
MANUAL SPRAYED MANGANESE (additional):
The craftsman, after placing several pieces or even a single one on a board , sprays the “Manganese” with a manually operated airbrush in a grazing way and from a specific angle, to accentuate the reliefs or create special shaded effects.
RUBBER BULB COLOURING:
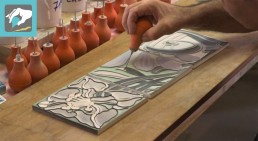
This type of procedure represents the ‘prince’ decoration of our ‘ceramic cloisonné’ technique, of which we can consider ourselves the pioneers in the world: it has been used on a regular basis by ‘Creazioni Luciano’ since the 1960s. Dozens of artisan decorators were trained in the historical factory, first under the guidance of Luciano Sr. himself, then by Giovanni, the now retired head painter. The craftsmen decorators, using as many beads as there are colours to be used in a tile, manually fill all the areas enclosed by the relief design. To accomplish this, they patiently pour the vitreous enamels one by one, which then flood the ”alveoli”, remaining confined by the ”relief border”. This type of decoration requires great skill, precision and dexterity because the decorator must manage three fundamental factors: -The first is to understand the right density of the enamel. -Then, making a harmonious and successful movement, he must simultaneously exert pressure with his fingers on the bead in proportion to the amount of colour sufficient to fill the ”zones”. -To add the difficulty, it should be emphasised that this “uncooked” glazes, besides having an ”earthy” consistency, do not in the least reflect the colour it will acquire after firing. Training over the years has led our guys to become faster and faster, to the point of setting real production records from time to time.
FINAL VITREOUS GLAZING:
The glazing process is performed by manually spraying the final transparent crystalline, which helps to even out the piece with a single lucid vitreous one or even a matte one. But what is a ‘crystalline’? To understand this, let us imagine a piece of glass chopped and powdered so finely that it becomes a very fine dust that can be mixed with water. In essence, a white ”liquid” glass that, when sprayed, melts at a temperature of 950° and becomes a compact transparent layer. This step not only serves to completely seal the piece but especially to even out all those parts that, not being covered by the colours when fired, would be ”rough”. Once the spraying has been completed on all sides, it is necessary to check and carefully clean with a wet sponge all the parts that are going to rest on the kiln shelves in order to avoid the harsh surprise of seeing your artefact “welded” on the shelf forever by the solidified glass.
MANUAL COLOUR AND GLAZE SPRAYING:
The craftsman manually sprays the coloured crystallines evenly on the surface and the sides of a tile, as in the case of our ”Background tiles”, or in a grazing manner with more subtle colours if he has to give a particular colour gradient effect to an important piece. It should be noted that in the latter case the craftsman will have to ”screen” all those parts of the piece that should not be ”shaded”.
SECOND FIRING:
As in the first firing, the kilnsmen, starting from the bottom upwards, carefully push all the pieces one at a time with their thumbs into so-called refractory ”boxes”. These, similar to small shelves, are fitted with many small flaps on the inner sides and serve to keep the artefacts separated one from the other, avoiding contact between the enamelled parts, which would otherwise stick irreparably. Once the burners are lit, the firing begins, only this time up to 950°. It is at this temperature that the vitreous enamels and coloured crystallines become incandescent, melt, liquefy, perfectly adhere to the tile body and remain trapped by the ”relief border” that prevents them from overflowing. Once the kiln has cooled, the previously opaque and earthy glazes reveal a shiny, bright and transparent appearance reminiscent of the colours of an antique stained-glass window.